
This post has two videos: Censored and uncensored. The censored version was made in three parts for YouTube, and I combined those parts for this post. The uncensored version was edited for this site. Because projected light photography is all about the creation of art, I don’t believe in censoring it. If you are sensitive to artistic works that may include nudity, watch the censored version. Otherwise, watch the uncensored version.
The full, no-censorship possibly NSFW version is this one:
The censored version created for YouTube is this one (I still won’t upload it to YouTube because I don’t trust that their AI won’t take my channel down by mistake):
AI Use Disclosure: I created the video entirely without the assistance of AI. I then put the transcript into an AI and asked it to convert the presentation to something that can be read smoothly without the accompanying video. I then edited, added to, and corrected the output. This is basically a transcript, plus a lot of work fixing it up and making it a high-quality article.
Introduction
As someone who is both an inventor and a photographer, I’ve noticed there’s a somewhat common overlap between these two vocations/avocations. Many inventors dabble in photography, and plenty of photographers look for novel ways to reimagine how photos can be captured.
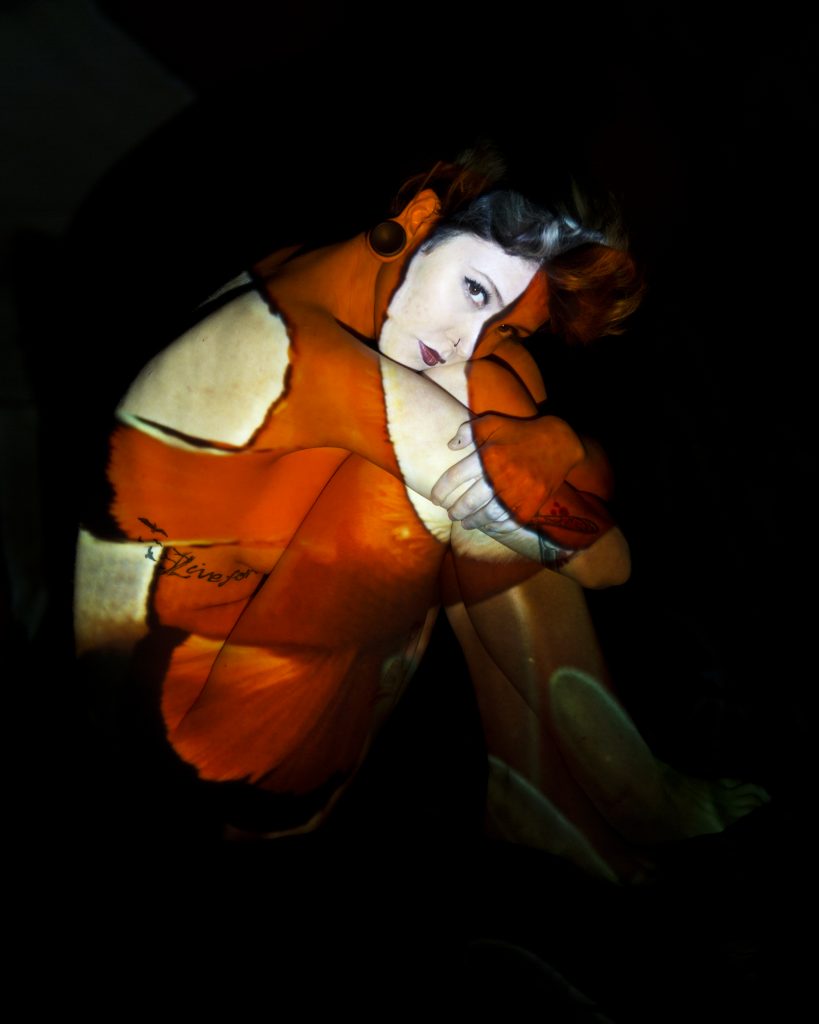
In this post, I’ll share how I developed a projected light technique for photographing models—a faster, less messy alternative to traditional body paint. It’s a style that blends artistic vision, technical problem-solving, and lots of experimentation. If you’ve ever wondered how the worlds of art and innovation collide, or if you ever wondered “how can I use body paint for photography without the mess”, this article is for you. But watch the video. Visual arts are usually better explained in a visual way.

The Challenge with Body Paint
Body paint photography can be mesmerizing—artists can make models fade into scenic backdrops or transform them into living canvases. But body paint has downsides:
- Time-Intensive: Painting the model can take hours.
- Messy: Removing and reapplying paint is laborious.
- Costly: Hiring a professional body-paint artist isn’t cheap.
As an inventor (and a creative photographer), I wanted an alternative that could deliver multiple creative “looks” in a single session without the fuss and expense of paint (or the pain associated with liquid latex). That’s where projected light entered the picture.
Origin of the Idea: From Handheld to Tripod
My earliest test involved a handheld projector. I wanted to cast an image—like a baby photo—onto a pregnant model’s belly. Unfortunately:
- Stability: Even a small hand tremor (or even the movement of taking a breath) caused the projected image to blur.
- Alignment: With handheld projection, any movement could cause the image to bisect an eye, move off the body, or otherwise look wrong.
Solution: I repurposed a standard ceiling-mount bracket and attached a tripod plate to it. Suddenly, my bulky projector could be mounted as steadily as a camera. This upgrade alone transformed the process, enabling precise alignment of images on a model’s body—no more guesswork or blurry mishaps.
Early Experiments and Lessons Learned
Hubble Images and Fading Effects
I initially experimented with public domain imagery, such as photos from the Hubble Space Telescope (which, as original U.S. government works, are free of copyright restrictions). Projecting these amazing images onto a model seemed brilliant in theory. In practice, the results looked more Star Trek than classic body paint.


- Primary vs. Secondary Lighting: If you add strong studio lights, the delicate projection washes out. So the projector itself often must serve as the main or only light source.
- Ambient Light: The more ambient light in the room, the higher the risk of losing the projected detail—especially critical for subtle images like distant galaxies.
- Models are Uncomfortable in Total Darkness: They are posing in a totally dark room except for the bright light shining right into their eyes. They’re essentially blinded to anything in the room. This is a great reason to have them bring a trusted friend to help them get into position. Otherwise, you’ll be forced to pick between physically touching the models (not a great idea) or spending lots of time saying “now 1 centimeter to the left… no, too far. A bit back. Oh wait, you moved your arm too much…” You get the idea.
The Reflectivity Dilemma
Human skin reflects light differently from clothing, tattoos, or hair.
- Tattooed areas may absorb or alter the color differently than bare skin.
- Fabric can reflect more (or less) than skin, producing bright “hot spots.”
- Hair and jewelry often add random flares of light.

Initially, I tried everything from matte fabrics to color-matched nylons—and even an array of post-processing tweaks in Photoshop. No perfect solution emerged, but it taught me a pivotal lesson: keep iterating on other aspects while continuing to puzzle out reflectivity in parallel. Innovation doesn’t require solving every sub-problem at once; tackle them as you can, and circle back when the time is right.
The Power of Collaboration
Each new session brought a different model, many with strong personal interests—whether it was an attachment to certain images or a statement they wished to make:
- Pregnant Model: Projecting an image of a baby onto the belly.
- Wedding Dress Shoot: A shaved-head model posed to symbolize personal transformation.
- Prozac Theme: A model who wanted to celebrate how medication had saved her life.
Their enthusiasm often sparked fresh ideas—such as incorporating colorful props (like popsicles) or wearing thrift-store outfits that I could lightly edit in Photoshop. Collaboration, even in personal projects, is a form of co-invention, pushing creative boundaries further than you could alone.
Faces: The Toughest Frontier
Humans are wired to detect even the slightest distortion in facial images. If the projection shifts by a fraction of a centimeter, a small line might bisect an eye or distort the model’s features. My process to manage this challenge included:
- Rock-Solid Tripod Setup: No wobbly table or handheld approach.
- Locking in Pose: The model stays immobile while I fine-tune the projector angle.
- Careful Framing: If I’m off by a millimeter, I realign the projector rather than asking the model to move.
Despite the intricacies, the payoff can be stunning: pictures where the model’s facial expressions seamlessly merge with cosmic imagery or bold patterns.
Overcoming Technical Hurdles: Exposure and Refresh Rates
Digital projectors typically refresh at 60 frames per second (or another set frequency). If your camera’s shutter speed is too fast, you might capture only a partial set of colors or one “phase” of the projection cycle. Achieving the correct exposure involves math:
- Match or Sub-Multiply the projector refresh rate. For example, if your projector refreshes at 1/60 seconds, shoot at 1/60, 1/30, 1/15, etc.
- Dark Rooms minimize uninvited light. The more you can isolate the model from ambient illumination, the more vibrant your projected image remains.
Outdoor vs. Indoor Backdrops
Early on, I tried shooting indoors against a “black” wall—only to find out black paint still reflects a certain amount of light. My later solution was shooting in near-complete darkness (e.g., outdoors on a night with no moon) so the projection had nowhere else to go but onto the model.
For truly complex illusions, you might need to juggle multiple projectors or carefully coordinate ambient conditions. But for most projected-light portraiture, a single projector in a dark room is enough to get captivating results.
Why Photography Resonates with Inventors
Photography offers instant feedback in a way patents rarely do. Filing a patent can take years of drafting, prosecution, and waiting. Meanwhile, snapping a photo is immediate—you can see if your innovation works in mere seconds and refine it on the spot. This aligns well with the inventive drive to experiment, adapt, and iterate quickly.
Moreover, photography pushes you to notice details—whether it’s the subtlety of reflectivity or the interplay of color and shadow. That same observational skill is invaluable in inventing, where success often hinges on spotting overlooked nuances and unmet needs.
Key Takeaways for Aspiring Projected Light Photographers
- Prototype Your Setup: Treat your photography gear like any invention. Find that “tripod hack” to stabilize your projector, or design a custom mount if you can’t find one that fits.
- Embrace Collaboration: Models, assistants, or fellow photographers can offer new perspectives that enhance your final results.
- Iterate on Sub-Problems: Don’t stall just because you can’t solve every challenge (e.g., reflectivity). Make progress wherever you can, then circle back.
- Balance Simplicity and Experimentation: Start by controlling lighting in a dark room, a stable mount, and minimal ambient light. Once confident, expand into more ambitious illusions or multi-projector setups.
- Keep It Fun: The best inventions—and the best photos—happen when you and your collaborators genuinely enjoy the process.
Conclusion
Projected light photography is a perfect example of how an inventor’s mindset translates into the visual arts. Rather than wrestling with messy, time-consuming body paint, you can harness the flexibility and vibrancy of a digital projector. Yes, challenges remain—such as reflectivity, perfecting exposure, and working in near-dark environments. But these are precisely the kinds of puzzles that inspire inventors to keep innovating.


If this journey sparks your curiosity, consider experimenting with projected light photography yourself—perhaps even inventing a better tripod mount or a specialized projector! As with any innovation, the path from concept to reality is rarely linear, but it’s full of learning (and surprising results) along the way.
Pingback: Why Inventors Are Often Photographers
Pingback: Creativity and the Art of Quantum Thinking